|
| Sneak-Thief ASM-2 Modular

|

| The ASM-2 Modular Synth Kit: Contents - 1 PCB & electronic components for 2x VCO's, 2x VCA's, 2x EG's, 2x LFO's, Variable State Filter, 24dB LPF Filter, Noise Gen, Glide, Ring Mod, S&H. The whole kit cost ~$340 US from Elby Designs.
But that won't give you a complete system. You still need to buy faceplate(s), pots, wires and a case of some sort. Easy way: Buy the component kits from Elby Designs. Hard Way: I hunted around for the rest of the parts for another $400 US (knobs/pots: Futurlec, panels: Blacet, cases: eBay, misc parts: Reichelt).
|
 Click for larger image
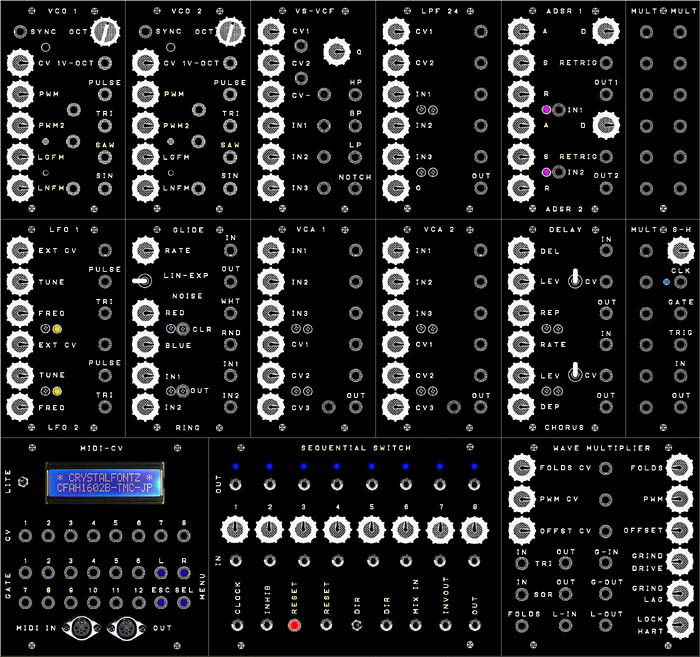
| My ASM-2 Layout:
The front panel is terribly important, seeing as it's the primary user interface for any modular. First of all, I decided that I didn't have a hell of a lot of cash to throw around
so I would have to cut a corner or two. Instead of getting custom-made front panels ($$$), I decided to use Blacet reject panels and to adapt them to the ASM-2 modular. (Elby Designs also offer their own ASM-2 modular panel for ~$120 US which is a great deal) The bottom rack of my layout is not yet complete:
it consists of an Midibox CV 8x CV out + 12 gate out midi-to-cv converter (this works great!) and Ken Stone CGS kits that I also purchased from Elby Designs. I decided to put a Wave Multiplier and 8-Step Sequential Switch on the bottom.
|

| Stuffing the PCB:
To be frank, the ASM-2 kit has a hell of a lot of parts; nevertheless, the components for each module come well organized in their respective plastic baggies. Stuffing began with resistors, then diodes, then caps, etc. I chose to socket all of the IC's for easy troubleshooting and to avoid overheating any of the chips. On the outside edges of the PCB, you'll notice that I bought cable sockets. This extra expense was definitely worthwhile!
|

| Now comes the case:
Anyhow, these panels have to go somewhere, right? The cheapest mounting solution was to buy a few Euro-rack format racks from eBay for only $15-$20 US each. The close-up photo here shows the excellent ubild quality of these racks. Since I'm located in Germany, these kind of racks are pretty abundant. I'm not sure what the North American equivalent would be, although there must be cheapo 3-unit 19" racks available.
|

| Module Panels:
As I mentioned previously mentioned, I decided to go with Blacet reject panels for $5 US each. There are several reasons for this choice, including the fact that I already had a rack of Blacet modules that would nice along with these. It wasn't that hard to adapt the hole-layouts of these panels to my own liking, although there are a few odd knob positions and extra holes (which would later be covered up). And compared to spending a good $150-$200 US for custom panels, I think it turned out to be a decent compromise.
|

| Knobs:
Compared to the knobs on my Blacet, I really skimped on these ones - but I swear it was with good reason! They're fairly nice milled-aluminum with a screw-fastener and a textured grip - more importantly is that they only cost $.25 each from Futurlec. Seeing as I bought a 100 of them for this project, going all fancy with the knobs could have easily increased the cost of this whole endeavor by 10-20%.
So I don't wanna hear anything about those sexy Moog knobs that cost $1.50 or more each. heheh.
|

| Jacks:
I find the Frac-rack module size convenient, albeit crammed. The 1/8" jacks don't bother me in the least but that's definitely a subjective opinion ;)
It was a bit time-consuming to mount all the jacks & pots, but thanks to the precision-drilled holes on the panels, the end-result looks good. I only had to drill a few more holes to accommodate my jack layout.
|

| Pots:
I used 16mm Alpha pots and they worked out to about $.35 each from Futurlec for the quantity that I purchased. They've got metal shafts and have a really nice smooth feel with the perfect amount of resistance. One complaint: many of the 100k pots that I purchased don't actually go to 100k! Many of them are between 90-100k and a few are in the high 80's (you get what you pay for!)
|

| Case Assembly:
Finally things are starting to come together. On the far right, you can see that I drilled a couple of blank panels in order to fill up the 19" rack. Since I was using Euro-rack cases, I somehow didn't realize that they're 45mm wider than Frac-racks. Oops! Well my mistake turned out just fine because I used the extra space to make multi's and to move the S&H module over to one side (as shown in the updated design layout earlier on on this page). If I become obsessive enough, I may paint them black at a later point in time.
|

| Delay & chorus FX:
What's that in the bottom right? Hey, those don't come on the ASM-2 PCB! I couldn't resist adding these 2 FX onto the main modular panel. I purchased these stompbox clone PCB's (Boss CE-2 & PT2399 Delay) from Tonepad in El Salvador. Here's the sweet part: they've been modified for CV control using Vactrol's :) I still have to modify them to work on modular voltage level instead of instrument level.
|

| Wiring Chaos:
The wiring makes complete sense to me, I swear! As per the developed of the ASM-2, Mr. Laurie Biddulph's advice was to use shielded cable for audio signals and 22-24 gauge for control signals.
Interestingly, it was recommended to not connect the shielding at the panel end, but to just snip it and either use heat-shrink tubing or electrical tape to shield the trimmed bit of shielding. The other ends, however, are supposed to be all connected to the ground.
|

| Control Cables:
I bought this crazy 22-gauge video-raster cable that's stiff as a board and has the exact same spacing as my PCB connectors. It's great because you can fold the cables and channel them and they maintain their shape.
I think I spent just as much time cabling as I did stuffing the PCB - no, more! Soldering the connectors on to the ends of each cable was definitely delicate and slow work.
|

| Grounding and CV Power:
Also, each panel has a ground wire for the audio jacks and also one for the control jacks. You can see a few of the green ground wires bunched up on the bottom left of this pic. The red/black wires are for +/-10V which power the CV pots without inputs.
Now this is the part that isn't for the faint of heart... ie. those who don't want to dig in and read the documentation. I chose to make my ASM-2 fully-modular, so I wanted to use as many of the CV inputs and routings as possible. Although Laurie Biddulph provides a great collection of documentation for everything, you're going to have to read *everything* to find all the answers.
I spent hours poring over all of the schematics - when it came to wiring, what really guided me the best was reading the ASM-Genie wiring guides for each module. I couldn't have put this together without those docs.
|

| Tying Up Loose Ends:
Tie-wraps are a must for keeping the cabling neat and tidy. It doesn't take that much time and it looks so much nicer.
NB. You can see the two little octave-switcher PCB's on the corner of each of the VCO's. Elby Designs sells these and they're worth the few extra dollars, considering the amount of time you'd have to put in to wire all those resistors to a rotary pot.
|

| We Have Liftoff:
By the time I was first able to power everything up, it had been about 2 months since I started assembling everything. A rough guess would be at least a few hundred hours in total. I was pleasantly surprised that everything seemed to be in working order... oh wait, the Sample&Hold wasn't holding. I unsoldered the main transistor responsible for holding then soldered it back on and voila!, it worked. Not bad considering the ridiculous part count.
|

| Labelling:
OK, that's some serious old-school embossed Dymo label action. And I love it! Some of the original Moog systems had these kinds of labels on them.
PS. Those LFO LED's that look blue are actually indigo ...it's quite hypnotic watching them pulsate, but not overly distracting :) I'm saving the blue ones for the CGS Sequential Switch on the bottom rack. Whereas the gate-inputs on the ADSR's are a pleasant muted orange - anything brighter would drive me insane.
|

| Power Supply:
Elby Designs offer a AC-DC power supply PCB that's really easy to assemble and uses a fat toroid for mains-to-18V conversion.
I used a different solution - I found a strange rack with a regulated DC power supply (non-switching) on eBay for $15 US + shipping. It was originally wired for +/-5V +/-12V, but I switched out the voltage regulators for +/-20V (for the ASM-2) and +/-9V (for the stompbox clones). You can see the front of this power supply rack on the next picture.
|

| Done!!
This is certainly one of those projects where you've got more time than money on your hands, and yet the end results are really high quality. At one point I almost purchased an EFM Wildcat II modular but I'm glad that I got this instead. Although it has less features, the ASM-2 has better support, better documentation & much higher quality.
It's worth mentioning that the knobs are really cramped, but other than that I would consider this system a success.
PS. Mr. Laurie Biddulph provides fantastic support for this beastie! |

| Not Done!! - Part 2:
So what about the other stuff on the third rack? Here are the two Ken Stone CGS kits: CGS 28 - Sequential Switch & CGS 29 - Wave Multiplier. What modular would be complete without a sequencer? And what about some freaky distortion? Yes, let's stuff those beautiful cherry-red boards and see what happens. CGS boards are very lovely high-quality PCB's with nice silk-screening & super-easy layouts.
|

| Here Comes Rack #3:
For the 3rd rack, I just bought a brand-new panel from Reichelt for 9 euro, drilled it, sliced it, painted it, then mounted all the pots, jacks, switches, and a pesky LCD screen.
Spray painting panels is ghetto, especially because they're prone to scratching. I suppose I could have clear-coated it, but I have neither the time nor inclination for THAT level of looks. It's just an instrument that's only meant to be played, right? Although I did paint the two multiple panels that used to be silver in the above pics... so I must care a little about aesthetics *snicker* Not to mention those purty blue led's that cost 10 times more than red ones ;)
|

| The Ugly Side of the Panel:
LCD bezels are a ripoff in Germany and probably elsewhere. Why would a person pay almost the same price for a bezel as the 16x2 LCD screen itself? Oh wait, because it's a huge pain in the ass to mount it otherwise, and you can be sloppy with the square that you cut out. (No bezel = ugly tape)
|

| Midibox CV
I looooove the Midibox CV. So much so that I dedicated a whole section of this panel so it could show off it's 8 CV and 8 Gate outputs. I even added a little switch for the LCD backlight, otherwise the LCD always being on would be annoying. |

| The End.
Well there it is, with my wee Blacet sitting proudly on top. 2 months of planning, 4 months of building. Probably 400-600 hours in total and worth every minute. I can't express how satisfying it is to jack things in willy-nilly and not be constrained by menus and synthesizer operating systems. It's pure, raw unadulterated fun to jack these cables in and build every patch from the ground up. Okay, sorry for eulogizing & gushing.
I've just found a source for the Soft-touch Re-An knobs that Blacet uses, so I'm considering replacing all these knobs and using them on another project. Then again, black is kinda sexy, isn't it?
Unfortunately I now have a case of modularitis: sitting in my hot little hands are more CGS kits, along with some boards from Oakley & Papareil. Oh no, is that a Wogglebug schematic over there? Hey, this SN76477 synth-on-a-chip looks easy to build...
|
|
Audio Samples
Here's the first noodle. It's some kind of 9-minute old-school minimal techno jam, circa 1995 *lol* The Blacet also got in on the action for the melody line. It was done all in one take with no external sequencers - the only external fx was reverb:
Close Grind
And here are some other initial recordings from the ASM-2. They sucked because they were recorded into a crappy soundcard and the diy stompboxes were distorting from not being adapted to modular levels:
ASM-2 Noodle: Burning Heart
ASM-2 Noodle: Crippled Bits
ASM-2 Noodle: Sample & Scold
I used the trigger out of the S&H clock generator to trigger the gate of VCO1. The S&H also processed the noise out to provide random CV's to VCO1. At times the LFO's were modulating pitch and filter settings (LPF24 + BP12).
Other DIY items:
- Sneak-Thief's Blacet Modular page
- Sneak-Thief's RS7000/NordMicromodular frankensynth
|
|

|